Outlook 2007 as mail client
So now you've got a fully functioning mail server. Well, now it's time to make use of that mail server and configure a remote mail client to retrieve mail from the server and send mail through the server.
For my example, I've chosen Microsoft's Outlook 2007. Other Microsoft products like Outlook 2003, Outlook 2010, Outlook Express and Windows Live Mail 2011 slightly varies, but you should be able to get here the general idea.
Likewise, if you using some non-Microsoft other mail client you should be able to get the idea. Please do not e-mail me asking for instructions on another mail client. This is the only one I'm going to provide for now.
It supposes that
- You already have configured the server to accept the domain (with vqadmin or by command line)
- You already have modified the MX record of the domain to point on you server
- You already have created an e-mail account for this domain (with qmailadmin or by command line)
We'll now configure Outlook 2007 to send and receives e-mails through our new server
1� Open Outlook and choose "Tools" and then "Account settings"
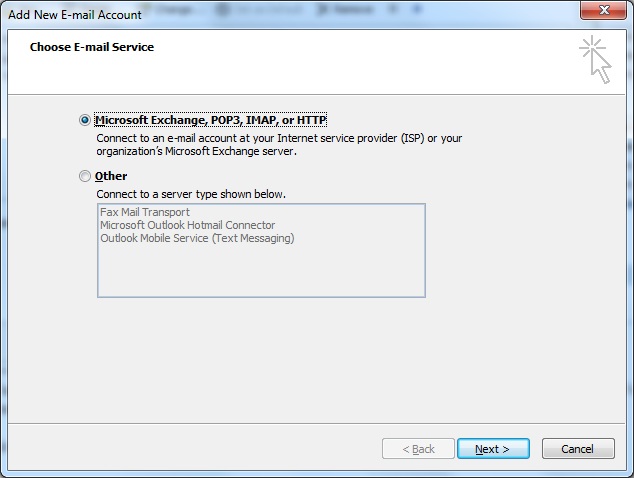
2� Choose "Microsoft Exchange, POP3, IMAP or HTTP"
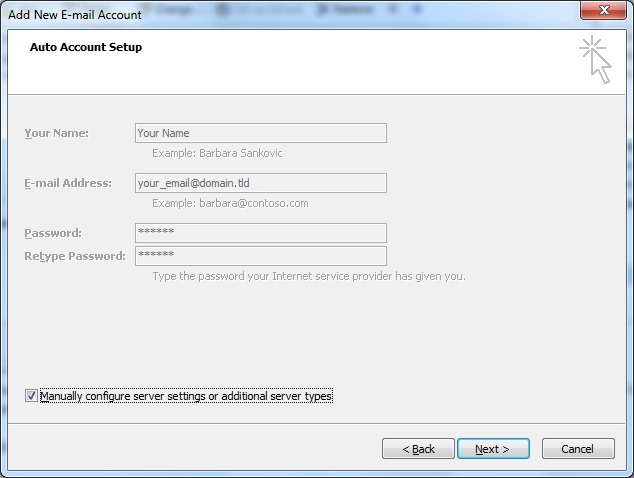
3� Choose "Manually configure server settings or additionnal server types"
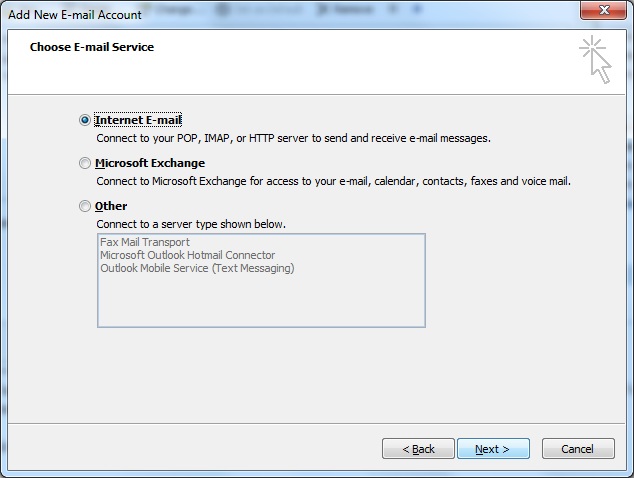
4� Then "Internet E-mail"
Several configuration are possible to retrieves e-mails from server:
You also have several possibilities to send your e-mails:
5a�
Getting mails through POP3 protocol
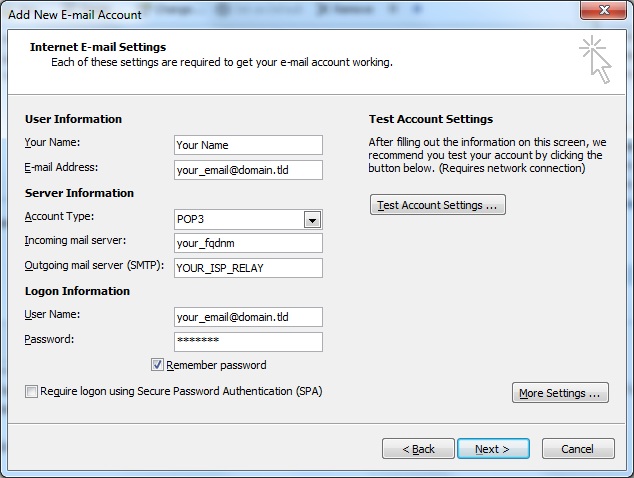
You need to fill :
-
Your Name : The displayed name on your correspondant 'screen when he receives an e-mail from you
-
E-mail Address : The e-mail address you are sending from
-
Account type : POP3
-
Incoming mail server : The Fully Qualified Domain Name of your server (or its IP address)
-
Outgoing mail server : It depends of the
chosen method. The most common usage is to set your ISP SMTP server.
-
User Name : The e-mail address.
By default Outlook automatically set the part before the @ of your e-mailadress. Change it !
-
Password : The chosen password for the considered e-mail address
Choose then a method for sending your e-mails
5b�
Getting mails through POP3-SSL protocol
You first need to configure Outlook to get your e-mails through classical POP3 protocol and then set the SSL layer.
You need to fill :
-
Your Name : The displayed name on your correspondant 'screen when he receives an e-mail from you
-
E-mail Address : The e-mail address you are sending from
-
Account type : POP3
-
Incoming mail server : The Fully Qualified Domain Name of your server (or its IP address)
-
Outgoing mail server : It depends of the
chosen method. The most common usage is to set your ISP SMTP server.
-
User Name : The e-mail address.
By default Outlook automatically set the part before the @ of your e-mailadress. Change it !
-
Password : The chosen password for the considered e-mail address

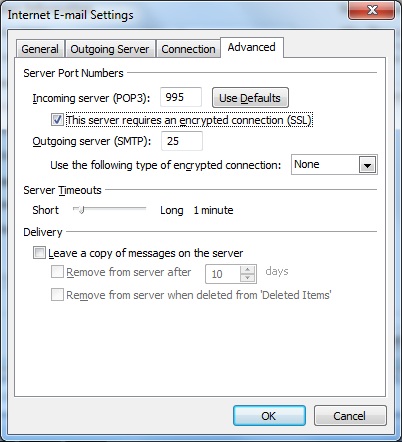
Then, you have to click on "More settings" button.Then "Advanced" tab.
Just check "This server requires an encrypted connection (SSL)" box
Choose then a method for sending your e-mails
5c�
Getting mails through IMAP protocol
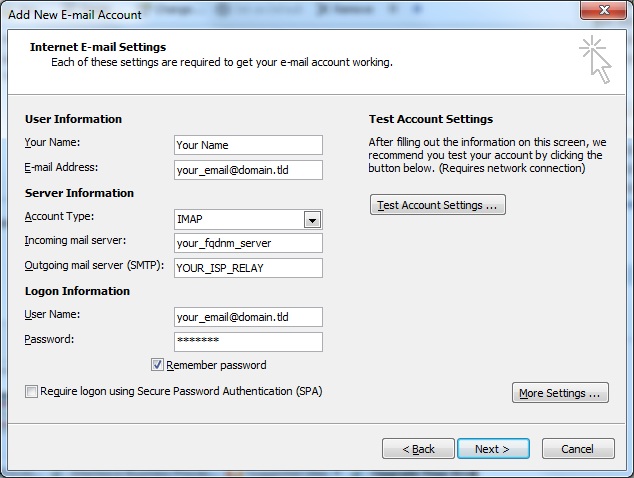
You need to fill :
-
Your Name : The displayed name on your correspondant 'screen when he receives an e-mail from you
-
E-mail Address : The e-mail address you are sending from
-
Account type : IMAP
-
Incoming mail server : The Fully Qualified Domain Name of your server (or its IP address)
-
Outgoing mail server (SMTP) : It depends of the
chosen method. The most common usage is to set your ISP SMTP server.
-
User Name : The e-mail address.
By default Outlook automatically set the part before the @ of your e-mailadress. Change it !
-
Password : The chosen password for the considered e-mail address
Choose then a method for sending your e-mails
5d�
Getting mails through IMAPS protocol
You first need to configure Outlook to get your e-mails through classical IMAP protocol and then set the SSL layer.
You need to fill :
-
Your Name : The displayed name on your correspondant 'screen when he receives an e-mail from you
-
E-mail Address : The e-mail address you are sending from
-
Account type : IMAP
-
Incoming mail server : The Fully Qualified Domain Name of your server (or its IP address)
-
Outgoing mail server (SMTP) : It depends of the
chosen method. The most common usage is to set your ISP SMTP server.
-
User Name : The e-mail address.
By default Outlook automatically set the part before the @ of your e-mailadress. Change it !
-
Password : The chosen password for the considered e-mail address

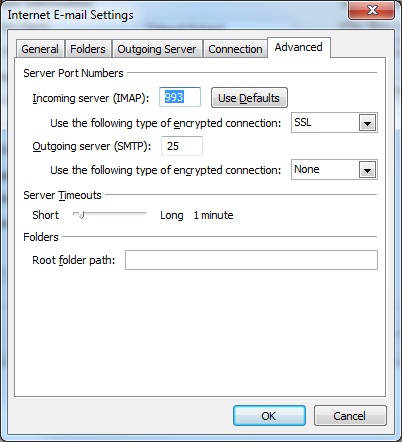
Then, you have to click on "More settings" button.Then "Advanced" tab.
Aside "Use the following type of encrypted connection", choose SSL
Choose then a method for sending your e-mails
6�a
Send your e-mails through your regular ISP
The easiest solution is to use your Internet Service Provider (ISP) SMTP server.
For instance, if you've a subscription with Belgacom in Belgium, the setting is relay.skynet.be
To do this, just set this setting into Outgoing mail server (SMTP) area.
If you had chosen POP3/POP3-SSL config :

If you had chosen IMAP/IMAPS config :

6�b
Send it through your server without authentification
Instead of using the SMTP server of your ISP, you also can use your newly configured mail server to send it.
On your server, you have to explicitely allow your IP adress to send e-mails through it.
Note that this solution could be unusable for you. Indeed, to avoid spams, some Internet Service Provider (ISP) prevents their customer to send e-mails through server on the Internet by port TCP 25. In such case, they oblige their customer to use a specific resource (an authorized SMTP server)
If you don't have such limitation, on you server, edit the file /etc/tcp.smtp and add your IP (XX.XX.XX.XX)
127.:allow,RELAYCLIENT=""
XX.XX.XX.XX:allow,RELAYCLIENT=""
Make this change active :
qmailctl cdb
When this modification is done on your server, you can come back on your Outlook.
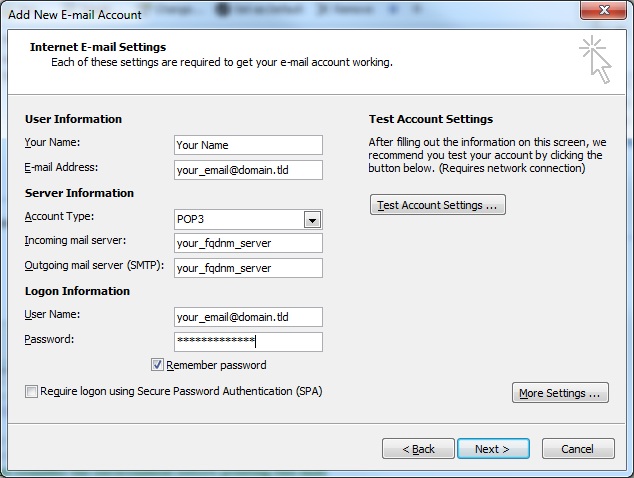
You have to fill your newly installed mail server as Outgoing mail server (SMTP)
Send it through an authentificate connection on your server with SMTP TLS
6�c Instead of using the SMTP server of your ISP, you also can use your newly configured mail server to send it after a successful authentication.
With TLS, the connection is first established as unsecure on traditional TCP 25 port and then secured after authentication
Note that this solution could be unusable for you. Indeed, to avoid spams, some Internet Service Provider (ISP) prevents their customer to send e-mails through server on the Internet by port TCP 25. In such case, they oblige their customer to use a specific resource (an authorized SMTP server)
If you don't have such limitation, you have to fill your newly installed mail server as Outgoing mail server (SMTP)

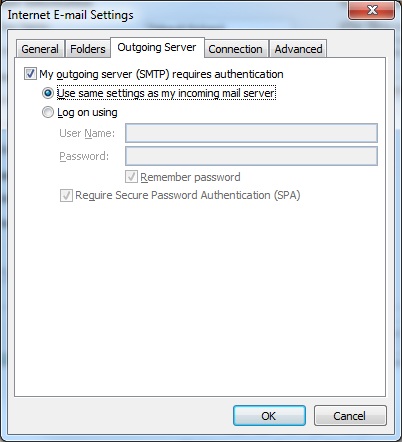
Then, you have to click on "More settings" button.Then "Outgoing Server" tab.
Just check "My outgoing server (SMTP) requires authentication" box
Select then the
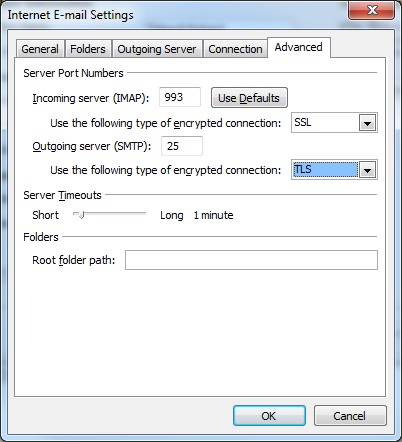
Advanced tab.
Aside "Use the following type of encrypted connection", choose TLS
Send it through an authentificate connection on your server with SMTP SSL
6�d Instead of using the SMTP server of your ISP, you also can use your newly configured mail server to send it after a successful authentication.
You have to fill your newly installed mail server as Outgoing mail server (SMTP)

Then, you have to click on "More settings" button.Then "Outgoing Server" tab.
Just check "My outgoing server (SMTP) requires authentication" box

Select then the
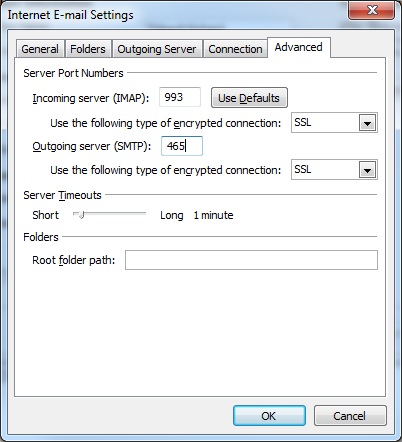
Advanced tab.
Aside Outgoing server (SMTP) set 465 as port number
Aside "Use the following type of encrypted connection", choose SSL
You can now proceed with optional tasks


